Saturday, April 30, 2011

Getting to the point....


...of the circular roof that is. This is the very last bit of roofing for the house... hooray! Well, that is not exactly true, the cupola is not done yet, but I think he is having that crafted off-site. It is pretty amazing to see this round roof installation. See the pointy pieces on the left, about to be lifted onto the roof? They get fastened somehow. I am not sure how it was all engineered because it seems to be working out well, so definitely not by the architect :-).

In other news, we came around the corner and the house came into view. Alex commented, "That is sure going to take a lot of paint remover." Guess he doesn't like the color and preferred the primer color of the siding vs. our chosen color.

Primer yellow: (I have grown to like it too, and my neighbors had an animated discussion about whether we should keep it yellow or greige).


Our new greige color: (I have to admit, it is pretty shocking to see --- and I don't mean shocking in a good way. I have gotten so used to the yellow that this looks blah). But, the trim color isn't up, so it looks so dull with no contrast at all.

Here is the inspiration house.


I thought the paint was so pretty that I wrote the owner a letter. She gave me her paint cans. Of course now I am questioning it a bit, but really think it is really just a matter of getting used to such a dramatic change.... I hope....


Now, watching these guys paint, up 3 stories on this ladder was a scary sight. See the guy starting to paint the trim in one of the above pictures? When he was ready to shift down to the right he would grab both sides of the ladder and "hop," I'm not kidding. I am definitely sticking with this color now because watching Ryan's eyes light up at this technique was too much! He would be thrilled to get up there for me and repaint any day!

Nicholas is not convinced the grading is right, so he is taking matters into his own hands in the bulldozer. Ryan is taking on the trenching.


In other developments, we have marked out driveway and sidewalks. The forms are in and I think they will pour them on Monday. This picture is redundant, but check out the sidewalk:

Here is the driveway:


The concrete block columns at the beginning of the drive will be gas lanterns with some horse fencing flanking them. Starting to look like a blank canvas that desperately needs some landscaping!

We created a little guest pull-off at the top of the driveway to keep guests out of the garage path / basketball court.


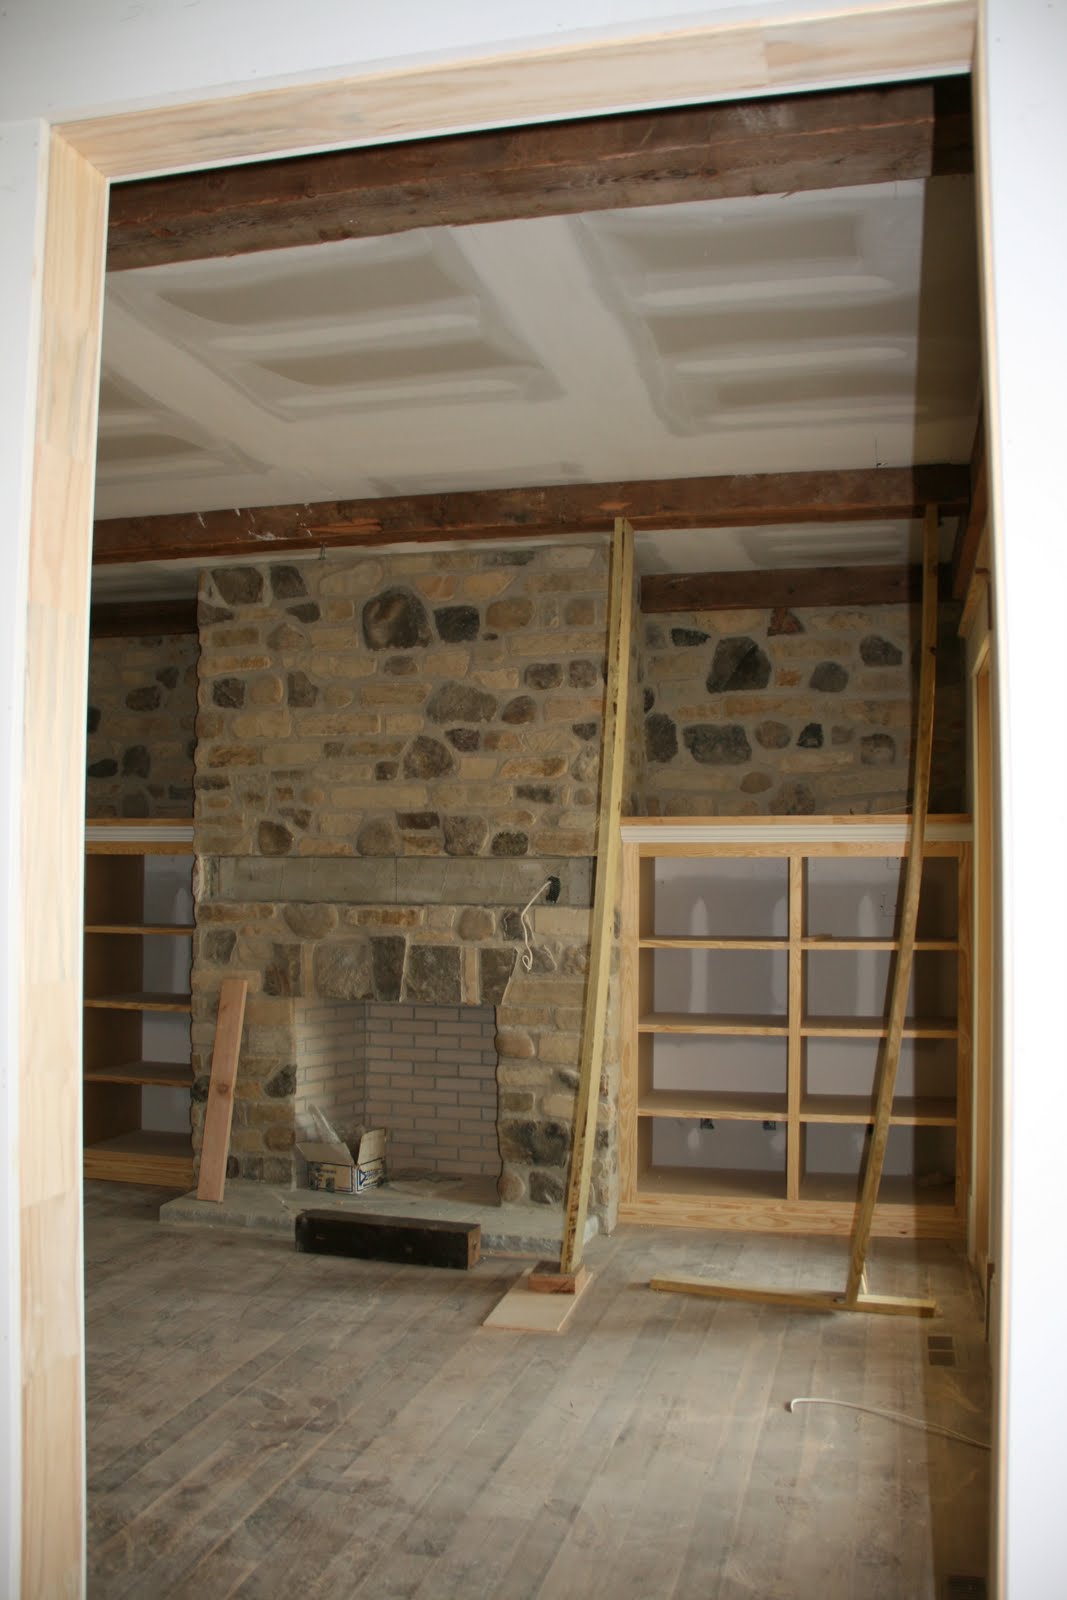
On to interior matters:

Hallway view. The wainscot is looking good. Will look even better with paint other than primer...I hope...


A bit of the granite went in this week. Just the White Diamond, so the pantry, butler's pantry and the kitchen. We expect the rest to go in on Tuesday and Thursday next week. That will be fun!


This program is not cooperating anymore, so I am going to hit go....

Tuesday, April 26, 2011

Precarious movement....

So I stopped out at the property to see a bit of the grading work, when I realized I was standing downhill (and down wind) from this situation....
Visions of the sloshing around taking place inside that little blue structure reminded me of my travels in China ages ago. My friend didn't want to go into the potty room because it was so nasty. Instead he went behind the building to pee. Well, I guess he deserved it, but he fell through, right into the pool of... well, you can use your imagination.... the poor kid, no spare clothes, and no spare shoes. He had to go out into the ocean to "rinse" as much as possible. Not the best spring break ever. For me, I luckily chose to leave for my spring break several days earlier and did not have to travel with this guy! I visited some Mongolian nomads and stayed in their "yurt" (a giant tent looking structure filled with Persian carpets). It was quite an experience, followed by a train across China.

Back to today.....

I stopped in the cabinet makers and he had put together the walnut for my island top. Have I mentioned just how much I love Walnut? It is beautiful! He had just gotten a special router bit to work on my ogee. It arrived 5 minutes before I arrived. He was so excited about it too that he busted it out and started routing. It was pretty exciting. Now all they have to do is 7 coats of Waterlox on each side, more on the ends! This is literally what they told me.


In order to avoid any form of warping or splitting in the future, they put steel backer rods on the underside. It looks pretty serious. Again, Dad would have loved engineering this with these guys. Luckily, dad would have approved as they used gobs of aliphatic resin glue (one of Dad's favorite phrases).


In other progress, they have put up my beams in the family room. These are cool, but were quite a production. I found a guy who had some beams torn out of an old barn in the area. They are HUGE. I had them rip them down into skins and beams, and they are each over 17' long. Here I am down at their sawmill, explaining, "no, I don't want that beam, I want the one at the bottom of the pile. I thought it was possible they might put me directly into their "ripper" machine. Check it out.... You can see my GIANT beam on the machine, getting ripped into smaller pieces.

Here they are up in my family room.... The mantel is not in place yet. It is a super cool old beam with mortise pockets cut out of it. It is oak. The only annoying part is that I was so particular about making sure I had finished edges on each beam, and the "ripped" edge would go against the ceiling. In several places they put the raw edge facing down... now we'll have to try to put a little stain in those areas to blend it with the ancient beam. Oh well.. They still look pretty darn cool.


The painters are there today. They have applied some goo to the windows, and seem to be spraying primer. If you ask me, it looks pretty sloppy and I am wondering why it isn't caulked and filled all over the place before bothering with this?


The round part of the porch seems to be completed, the ceiling v-groove and beams. Nick wants the v-groove stained an orange color. Guess we'll use a cherry stain on the v-groove. I think the beams should be dark though for sure, not the orangish business. When will I ever learn just not to ask? :-) I think the darker stained beams will be a good contrast to the "orange?"


The columns all seem to be in place. In the picture above, the one that touches the house (on the far right), is a problem. It looks off. I think it needs to be cut down and embedded in the house. Wonder what the architect specified (or didn't specify)? If that doesn't work (the pie shaped piece might be a problem), I think we need to just ditch the column completely and return the handrail to the house.

The grading is starting to take shape...I am anxious to get back out there and see how it looks after several more hours and loads of dirt....

Monday, April 11, 2011

Cocktails anyone?

Well, Sunday was picture perfect and we couldn't resist taking cocktails and a picnic out to the new porch. Of course, the porch is 3/4 finished, but so fun to sit out there! The boys think this is 3 fireplaces in a row....uh, no.


On a scarier note, it is time to call in the exterminator.... there is a giant spider in the attic. I had no idea it lived there, but the attic stairs are in now and we saw it....
Check it out....

Geronimo and his gang have been working on the trim and wainscot. After my miniature hissy fit (miniature according to me, Geronimo and Lloyd might have a slightly different opinion), they are doing the trim my way. I am happy about the coffers, think they look great. I think the wainscot will be good (I was disappointed that the upper box was not vertical, but I am moving on), and they will add another baseboard piece because I think it still needs it. Additionally, the cove moulding still needs to be added to the boxes. Geronimo will be back on Thursday.... he needed a vacation. I don't know why?

Seriously, I have nearly driven myself crazy this week, so I can only imagine Geronimo's mental state!


The stairs have this beautiful walnut trim cap along the wainscot and they put base moulding on it.... it has to go.... the piece of wood is too pretty to cover, and why the heck do we need base moulding halfway up the wall?


Dinner is calling...more pics later....

Monday, April 4, 2011

We've got gas!!!

Before you go buy the Beano or Maalox, I did mean the LP kind. They have buried a tank and dug the trenches for our gaslights out at the end of the invisible driveway. The trench runs all the way around the driveway, and it was very amusing to watch the dumpster dumper try to figure out how the heck he was going to get to the dumpster behind the trench. I have no idea how he reached it, but we have an empty dumpster now.

It also appears they are starting to put some columns up. I'd like to say I'm happy with this, but upon looking at the picture, it looks incorrect and my builder will be getting a call in the morning, darn. It appears they lined the column up with the steps, and not with the windows, maybe it is my camera angle, I'll have to go look in real life in the morning, but it looks pretty off to me. They've got some 'splaining to do!

More trim inside....Pantry...

More bits of the island got installed, doors, etc, and I am trying to figure out backsplash material for behind the range. Simple subway tile, or a creamy stone, like a travertine?
The creamy subway tile is pretty basic, but it would just blend in (goal). The travertines are pretty stones, but there is granite on the countertop and it might get busy, hard to really tell yet. I suppose I should revisit this once the granite gets installed. Also, if I get the plain creamy subway tile, should I go for the larger size (4x8), or a smaller one (3x6)? Would it be better to have a matte subway tile, vs. this polished? I don't know. Wish I could easily find some samples.

Here are a couple of pics of the overall kitchen, and some have the tiles in them....


These are not great pics of the tile options.... but my camera battery died!

Sunday, April 3, 2011

Hip Hip Hooray...we have a mudroom! I have always wanted this!

I can't believe that one of the most exciting rooms in our build is the mudroom! I am so excited to have a place for the backpacks and stuff --- in this house it is on the kitchen table, or the counters and they do their homework and then when it is time for dinner, I move it. Inevitably, I hear, "Mom, it was right there, where did you move it?" Sometimes they set up on the dining room for bigger projects, and sadly, I don't mind it, because it isn't in the way. So, we created six locker / cubbies - one for each kid, and then one for Lanie. Or maybe for a guest, but Lanie will be stylin' with her leashes, etc here. I am pretty excited because we have created this little study for the kids, right next to the mudroom. First the mudroom pictures....


See the little charging station when you walk in the garage door?

Just cross the hallway and here is the kids study. I am also very very excited to have this dedicated space. Why we originally had 2 desks in here when we have 3 kids is questionable. Each kid has chosen their space, and that will be great.


Additionally, Nick mentioned doing something cool to enter the wine room yesterday, and voila (don't know how to write the appropriate accent), it magically appeared today!

His dungeon door is ordered, clavos and all.... I hope it is cool, because this was out of my control! The wine room is extremely dark and dungeony, and we have just heard that one of our neighbors (very serious wine connoisseur) is actually bringing in soil and planting grapes, so we'd better get up to speed quickly. I'm thinking the summer trip to Provence will help.... at least in the wine tasting areas!


They also finished the floor of the circular porch.... so glad to have that done (wet mortar in the pics)! I am looking forward to seeing a completed fireplace and pillars and railings, etc!

Saturday, April 2, 2011

Cabinets, cabinets and more cabinets....

We went out to the house at the crack of dawn today. It is hard to go around scrutinizing everything with a house completely packed with workers! Arriving at 7:15 this morning was STILL not early enough.... Geronimo and his crew seem to be working in a different time zone.... they were already there, whistling and singing... getting the day started. Bronco was putting some v-groove up to be the backed for the mudroom. I can't wait to see that, we figured if we hung around for 30 minutes, it would have been done, but lots to do today, so we couldn't just stand there all day watching... though it would be much more fun doing that than the sprucing up and little projects we need to do at our current house to get it ready to sell.....

Thursday, Cory, the cabinet guy started setting out the island. They shifted it back and forth, and it seemed right. Friday, the guy came to template for granite, and I looked at the island and about freaked because it was not aligned.... I don't know if all of the crews nudged it and shifted it, or what, but thankfully Cory showed up and I showed him. He agreed, and promised to fix it. This morning something seems not quite right about the alignment, but Nick thinks it is fine. I don't know, I was distracted by the catchy tune Geronimo was singing.

Anyway, here are a couple of shots from this morning....
This first one is of the breakfast area. The banquette was actually supposed to not have drawers (I cut the drawers out to save money), so that is a pleasant surprise! The cabinets flanking the banquette look good, but I expected them to be a little bit wider --- there are refrigerator drawers going in the one on the right, and the cabinet guy was going to make these cabinets a bit wider. He was so pleased with himself that he was able to shrink them a bit to make the banquette bigger and give us a bit more room. It isn't a big deal, but I might have told him to either stick with the scale, or alternatively, I might have put a sconce between the cabinet and the window. I guess I'll put up my Bennington candle sconces there? That will look good I think. Nick and I were figuring this morning that these fridge drawers will be where we keep all of the drinks, it will keep the kids out of the cooking zone, which will be nice, and they won't have to climb all over the counters to reach the glasses. Cory still has to put the little cap on the banquette, and obviously some drawers are missing, etc., but you get the idea...It is hard to see in the picture, but the ceiling is a really cool v-groove barrel vault that follows the line of the window. Once it is all stained, I think It'll look really pretty.
;


Here are some pictures of the kitchen and island....They are still working on the walnut top. I cannot wait to see it!

Here is a shot of the hood cabinet --- still trying to determine if the height is a total headbanger for Nick. It is about 6' tall at the arch, so the insert will be right about at the maximum recommended height. I called the manufacturer about raising it above that, and they said several inches would be no problem at all, the cfm's wouldn't change noticeably, especially with our pretty direct shot out the roof venting. She said they test the cfm's in a setting with 2 elbows and 20' runs, and that is how they list them, so cfm's are actually typically a fair amount higher than listed. So, anyway, though Nick is saying the cabinet it fine at this height, we could raise it 2 more inches while it is just the empty box and never have the head banging possibility. On the flip side, the higher it gets, the more you'll see up in to the fan stuff, and the mantel will be getting super high..... Nick says to leave it alone, but he doesn't like to change anything, and it would be very easy now, much harder later, so I want to be sure we are making the right choices!


Here is a shot of the butler's pantry. Think I've shown this one before?